Why (and How) I Build Canvases for the GitHub Copilot App
Every agent conversation eventually hits the same wall: the agent did something, and you have to reconstruct what from a wall of text.
I hit that wall constantly. I work across a lot of PRs and issues in a day, context-switching between repos and tasks, and reconstructing “what changed” from chat prose doesn’t scale at that volume. I’d get to the end of a session, skim back through a dozen paragraphs, and still have to piece together what was investigated, what got tested, and what files moved. What I wanted instead was a layout: issues found, files changed, tests run, and the plan, all laid out somewhere I could see them, not buried in prose.
The app already gives you real tools for pieces of this: a Files changed tab for the diff, and a PR overview with CI check status baked in. But none of them assemble into the shape I actually think in, and hopping between tabs on top of a dozen paragraphs of chat is exactly the context-switching I wanted to cut.
So I built a canvas to keep the work in one view.
What is a canvas?
Per the GitHub docs, a canvas extension is “a shared, interactive surface for a work artifact, such as a plan, triage board, browser session, release checklist, dashboard, incident, or spreadsheet.” The key word is shared: canvases are bidirectional. The agent updates the canvas while it works, and you edit that same surface. Once created, it opens in the app’s right side panel.
Under the hood, a canvas is less magical than it sounds:
- It’s a small piece of code the Copilot app runs alongside your session: a single
extension.mjsfile. - It’s usually backed by a loopback HTTP server that the extension spins up in its
open()handler. The host then renders the canvas in an iframe. - The app also has built-in canvases for Excel, Word, and PowerPoint files, plus an editor and a terminal. This post focuses on custom canvases served by an extension.
- It lives under
.github/extensionsif you want it project-scoped and shared with your team, or~/.copilot/extensionsif you want it personal and local.
The app looks for exactly two calls to bootstrap all of this: joinSession() registers your extension with the running session, and createCanvas() inside it is what says “this extension has a canvas, here’s its open() handler and its actions.” That’s specific to the Copilot app’s extension SDK, not a cross-tool standard, but there’s no separate manifest file describing the canvas beyond that call. Here’s what that looks like in extension.mjs:
1
2
3
4
5
6
7
8
9
10
11
12
import { joinSession, createCanvas } from "@github/copilot-sdk/extension";

await joinSession({
  canvases: [
    createCanvas({
      id: "my-canvas",
      displayName: "My canvas",
      description: "A canvas that does nothing yet.",
      open: async () => ({ title: "My canvas", url: "http://127.0.0.1:PORT/" }),
    }),
  ],
});
The sections, actions, and hooks in the rest of this post build on that example.
One small correction to the docs while I’m here: they mention a package.json as a commonly included file. In practice, don’t add one. The CLI auto-resolves @github/copilot-sdk for you.
Why make canvases
A few reasons canvases are worth having:
- They give you a visual representation of what the agent is doing, instead of a scrollback you have to mentally reassemble.
- They give you a place to interact with the agent: a shared surface you can both touch, not just a transcript.
- They replace yes/no chat exchanges with something visual. Instead of the agent asking “should I do X?” and you typing “yes,” the agent can just show you the state and let you steer it directly.
The range is bigger than a status board, too. Some canvases are simple, like the review-flow example below. Others let you edit a document or spreadsheet directly in the app. Once you’ve built a simple one, it’s easy to see how far the idea stretches.
How it works
To make this concrete, I built a review flow canvas around the problem I started with. It surfaces a session’s activity in structured sections (issues found, files changed, tests run, investigation notes, and the current plan), so I can follow the work as it happens instead of reconstructing it after the fact from chat. Here’s how I built it.
1. Start with /create-canvas
This skill is built into the GitHub Copilot app. Open the app, start a session (an existing repo or a scratch workspace will work), type /create-canvas, describe the workflow and capabilities you want, and send Copilot off to scaffold it.
My prompt:
“Create a canvas that visualizes the agent’s dev workflow in real time: what it’s investigating, editing, testing, and planning next, so I can follow and steer the work as it happens instead of after the fact.”
From that single prompt, the agent scaffolded a real extension: a loopback HTTP server, five structured sections (issue, investigated, files changed, tests, plan), a live SSE feed so the canvas updates without a manual refresh, and a matching set of actions (set_issue, log_investigation, log_file_change, log_test, set_plan) it could call to fill each one in. When I opened it, all five sections were there, each showing an empty-state message:
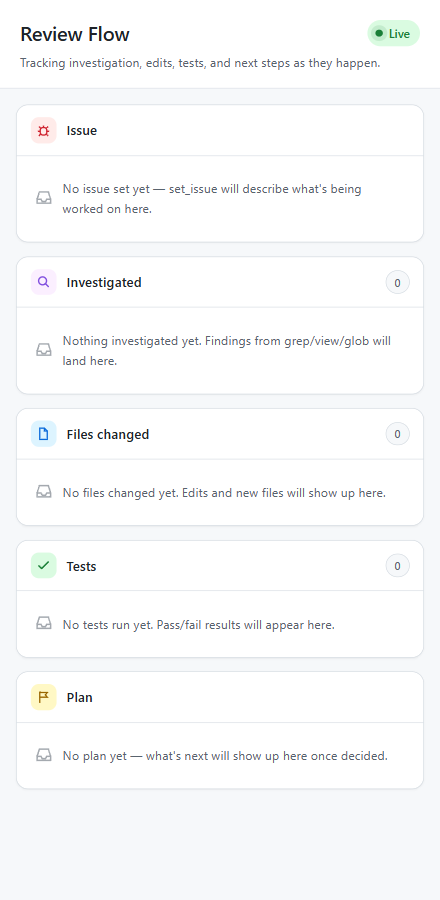
Structurally, that first pass was already close to right. What the canvas didn’t have yet was any instruction telling the agent how to interact with it.
2. Tell Copilot how and when to use the canvas
If you don’t tell the /create-canvas skill how the agent should interact with the canvas, the canvas may never open on its own, or it’ll open once and sit there while the agent narrates everything in chat like it isn’t there. That’s what hooks are for: instructions fed into the agent at specific points in the session lifecycle. Below are two hooks. They both live in the same extension.mjs from step 1, inside the same joinSession({...}) call, alongside the canvases array.
Open hook, fired at session start, gets the canvas on screen before any work happens:
1
2
3
4
5
hooks: {
  onSessionStart: async () => ({
    additionalContext: "This session works against the 'review-flow' canvas. Open it now via open_canvas, before touching any files, so there's a place for the issue, plan, and progress to live from the first turn."
  })
}
Review-flow hook, fired after every tool call, keeps the canvas populated instead of static:
1
2
3
4
5
6
7
8
9
10
11
12
13
hooks: {
  onPostToolUse: async (ctx) => {
    const section = {
      edit: "files changed", create: "files changed",
      powershell: "tests",
      grep: "investigated", view: "investigated", glob: "investigated",
    }[ctx.toolName];
    if (!section) return {};
    return {
      additionalContext: `The '${ctx.toolName}' tool just ran. Log this to the '${section}' section of the 'review-flow' canvas via invoke_canvas_action before continuing.`,
    };
  }
}
Without the first, the canvas from the screenshot above never opens on its own. Without the second, it opens but stays empty while the agent keeps narrating everything in chat out of habit.
3. Interact with Copilot through your canvas
A canvas that only displays state is half the point, and that’s exactly what the first /create-canvas scaffold gave me: five sections, live-updating, nothing clickable on an item. That’s a reasonable starting point: get the display right before deciding what deserves a button. But it meant the canvas could show me everything the agent had done without giving me a way to respond. So after that first call, I added “Ask Copilot,” “Add to chat,” and “Confirm & tell Copilot” buttons to every logged item, one per interaction pattern I wanted:
- “Ask Copilot” is for when an item raises a question rather than needing an answer typed out. On an investigation entry, it fires a
fetch()to a route on the canvas’s own loopback server, which reaches back into the session and asks the agent to expand on that specific note, so the answer comes back inline next to that note instead of in a fresh chat wall. - “Add to chat” is for pulling a logged item into the conversation as a visible message, the same as if I’d typed it myself, so I can ask “why this fix and not X” about the
SearchBar.tsxentry without retyping context the agent already has. - “Confirm & tell Copilot” is the quiet one: checking off a test entry attaches that confirmation as context for the agent’s next turn, without posting a message nobody needed to read. Confirming and correcting happen on the artifact itself, not in a side conversation about it.
4. Clean up the UX/UI
First-pass canvases tend to look like what they are: scaffolded output. Here’s mine squeezed down to actual side-panel width:
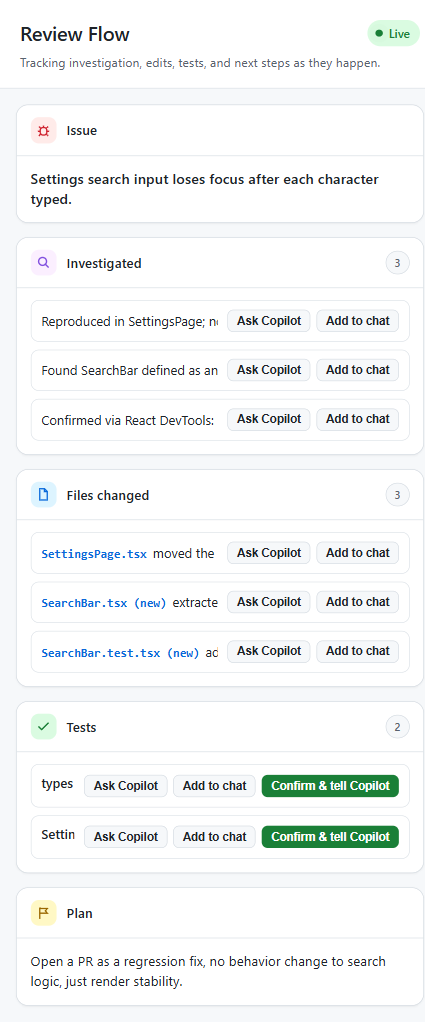
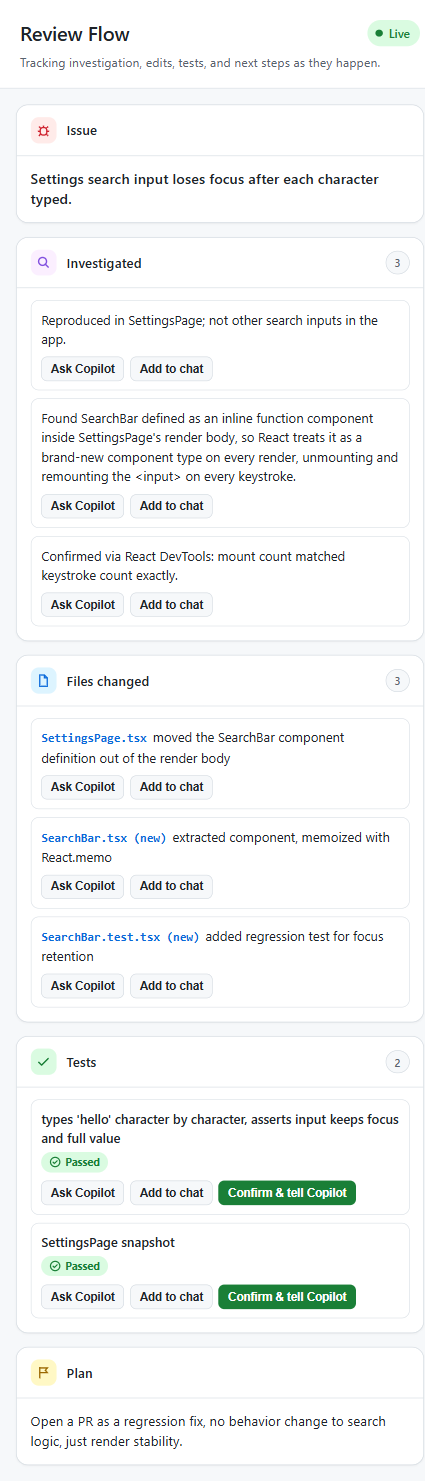
I audit canvases with /impeccable and Playwright MCP together: Playwright opens the canvas at its real loopback URL and resizes it to the width it’ll render at, and /impeccable audits the DOM at that width instead of a wide desktop screenshot. Install once with npx impeccable install, then run /impeccable <command> in the agent like any other slash command. That combination caught two bugs in the screenshot above. Item rows were pinning the action buttons next to the text on a single non-wrapping line, clipping investigation notes and test names mid-word. The pass/fail status icons had no explicit size, so they inherited the SVG’s default dimensions and ballooned into oversized circles. The fix: stack each item’s text above its buttons instead of forcing one line, let long text wrap naturally, and size the status icons explicitly.
5. Distribute the canvas
Once a canvas is working the way you want, getting it in front of other people (or your other machines) is the easy part. A few ways to hand one off:
- Plugin, with a deep link. A deep link opens the app and installs the plugin directly.
- Gist sharing. It’s built in via “Share extension as gist…” (or the
share_extension/install_extensiontools). Install straight from a gist URL. - Repo folder URL.
install_extensionalso accepts a GitHub repo folder URL directly, a good option if you’d rather distribute via a public repo than a gist. - Commit to the repo. Put the extension under
.github/extensions/<name>/, and it ships with the repo for your whole team automatically. There’s no separate install step.
However someone acquires the canvas, the files land in a project, user, or session scope, where the GitHub Copilot app picks it up the same way it picks up any extension: at the next session start.
Pick whichever matches who actually needs the canvas: a teammate on the same repo doesn’t need a gist, and a stranger on the internet can’t use a repo-committed extension.
Closing thought
The chat wall isn’t going away, and it shouldn’t. It’s still the best place to define intent and work through ambiguity. But the reconstruction problem I opened with was never really a chat problem. It was a display problem: I didn’t need the agent to explain what it touched, tested, and planned; I needed to see all of that laid out somewhere I could point to. That’s what a canvas is for. Building one starts with a single prompt to /create-canvas describing whatever you’re currently reconstructing by hand, then wiring the canvas to open at the right moment, teaching the agent what to log where, and cleaning up the rough edges before you ship the result.